 |
| Veggie Spring Rolls (Easy, Freezer-Friendly) |
I love Spring Rolls, but I have trouble finding any that meet my requirements:
1) Reasonably priced,
2) Tasty,
3) Vegan, and
4) Not deep fried.
I love the convenience of the ones in the freezer section at the grocery, but unfortunately, although they're Vegan, they often don't meet ANY of my other requirements. The flavor of commercially produced Spring Rolls has really gone downhill in recent years (perhaps living in Asia spoiled me?) and I often find them a disappointment, and use the dip to cover up the flavor rather than enhance it!
I found
a great recipe on Mom on a Mission, (I LOVE her blog!) but I tweaked it a little to meet my preferences. When I made the original recipe, I felt that the moisture in the veggies made the wrapper become soggy too quickly when serving, so I cooked the veggies before filling the wrappers to cook away the extra moisture. I also added mushrooms to give a nice savory flavor and chewier bite, and adjusted the seasonings a bit to my taste. But, I KEPT her great concept of quick and easy Spring Rolls that are Freezer-Friendly and can be made in bulk for when you need them : )
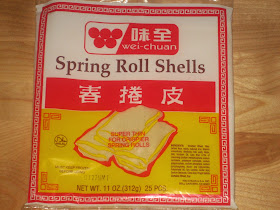
I found Vegan Spring Roll wrappers at more than one Asian or Specialty Grocery Store. This is the brand I used for this recipe:
For the filling, I shredded the carrots in a machine (yes, I actually HAVE a Salad Shooter - no Chia Pet yet, tho ; ). In contrast, I found that machine- slicing the cabbage made it too fine for my taste - I prefer the slightly coarser texture that comes from hand-chopping. I chopped the canned (tinned) mushrooms, and just added everything else into my huge skillet (actually a 14" Paella Pan) added the seasonings, and cooked it till the veggies were done and the moisture was gone.
Then, I rolled it up in the Spring Roll wrappers.
 |
| Wrap 'Em Up! |
At that point, I baked some and froze the rest. If you wish to use them later the same day, you can also keep them in the fridge at this point - before baking.
 |
| These are going in the Fridge. For the Freezer, I would put waxed paper between the layers. |
This recipe makes about a dozen Spring Rolls. For efficiency sake, I recommend doubling it for your freezer, but you will probably have to cook the filling in two batches to fit in your pan - unless you have industrial-sized cookware to work with. I even made it in two batches with my extra large pan.
If you use frozen commercial wrappers, you will want to thaw them for 1/2 hour before using. Then, make sure that they're not drying out while you're wrapping up! Either keep them covered in plastic or in a damp towel. (or work really fast ; )
Here's the recipe
Veggie Spring Rolls
Cook in large non-stick pan till vegetables are done and liquid has all evaporated
1 cup Carrots, Shredded
1 small Head Cabbage (or 1/2 of a very large head) very coarsely shredded
1 Tablespoon Toasted (or "Dark") Sesame Oil
1/4 Cup Soy Sauce
1/2 teaspoon Onion Powder
1/4 teaspoon Ginger Powder
1/4 teaspoon Garlic Powder
Allow filling to cool (so that you can easily handle it) then wrap it in Spring Roll wrappers as described on the package - burrito style. I use about 1/3 cup filling per wrapper.
At this point, they can be frozen, with layers of waxed paper between layers of Spring Rolls, or they can be baked.
To Bake, Place rolls on baking pan (preferably a pan that will crisp the bottoms*), Brush lightly with Oil, and Bake in a 425 degree oven for 20 minutes.
If you do not care to bake these, they can be browned in a generously oiled (1 to 2 Tablespoons Oil) nonstick skillet till crunchy on all sides, if you like. (I have not yet tried to pan-fry these without oil, but if you try it and it works, I'd love to hear! )
I use a silicone pastry brush for brushing on oil. If you do not have such a brush, you can simply dip a little corner of paper towel in oil and rub the oil on the Spring Rolls. If you do not use oil, these can be made with no oil at all - they don't brown quite as nicely, but they still turn out pretty tasty.
*I bake these on my perforated, non-stick Pizza pan so that they will not get soggy on the bottom.
This is being shared on
The Art of Homemaking Mondays
Try a New Recipe Tuesday
Healthy, Happy, Green & Natural
.jpg)


