Friday, May 22, 2015

Easy No Knead, Vegan Crescent Rolls

Easy No Knead, Vegan Crescent Rolls
I love Crescent Rolls, but don't want the hassle of making them the old fashioned way. I also don't like the guilt of feeding my family food that comes out of a just-pop-to-bake can that probably has a lot of chemicals in it, and really doesn't taste homemade. And, I like my baking to be Vegan.

This recipe is the answer to my dilemma - super easy to make, and super tasty - and Vegan! : ) They're tender, moist, and pull apart in layers.

I always make bread by the Artisan Bread in Five Minutes a Day method  (and, I think EVERYONE should own their book!). But, they didn't have a Vegan Brioche-type dough, so I created my own recipe using their method : )

The use of Tapioca Starch, Potato, and Sugar tenderizes & moisturizes the dough, and make a moist, tender, fluffy loaf without the use of oil or eggs. 


It is SOOO easy to make - and produces such spectacular results! This recipe produces about 3 dozen Crescent Rolls (if you'd like a smaller batch, scroll down)

This is the same dough I will be using for several other breads on this site, so you can make a big batch and use half for, say Challah, and the other half for Crescent Rolls, if you like (other recipes still to come in future months! : )

Easy, No Knead, Vegan Crescent Roll Dough **** (Scroll Down for Smaller Batch)
This recipe makes about 3 dozen rolls, or 18 rolls & 1 large Challah.
Measure into a 6 quart container*, in this order
3 Cups Warm Water (baby bath water temperature. If in doubt, make it too cool rather than too warm)
5 1/4 Cups Unbleached, All Purpose Flour
1/4 Cup Tapioca Starch (you can substitute Cornstarch, if you like)
1 Cup Potato Flakes (yes, that's right, the stuff people use to make Instant Mashed Potatoes)
1/2 Cup Sugar
1 Tablespoon Yeast
1 Tablespoon Salt
Stir well with a spoon till no patches of dry Flour remain.

The dough should look like this right after you stir it.

Cover loosely with lid (don't fasten so securely that it cannot "breathe")
Leave it on the counter for 2 to 5 hours.
Now, put it in the fridge till you're ready to use it **

The dough should look like this after it has sat out on the counter for 2 to 5 hours.


Note - do not "Punch Down" this kind of dough. 

When you're ready to bake the bread, remove it from the refrigerator and dust it VERY WELL with Flour. This is a moist, sticky dough, so don't be afraid to use lots of Flour!

Oil your pan (I use a Perforated, Non-stick Pizza Pan, like this one for baking)

Take one pound of dough (1/4 of the large batch or 1/2 of the small batch) and roll out in a rectangle that is approximately 8"x12".

Roll Dough out into Rectangle.


Cut in long, thin triangles. A pizza cutter works great for this job, or just a large Chef's knife that you can press down and cut the dough without pulling.

Cut Dough in long, thin triangles.


Roll each triangle up and place it on the pan.

Roll up triangles.


Leave to rise for 30 to 60 minutes (the last time I made these, I only let them rise about 15 minutes - they were still great : )

Allow Rolls to rise for 30-60 minutes before baking.


Preheat oven to 350 degrees Fahrenheit, and bake in the middle of the oven, without steam for 35-40 minutes.

Upon removing from the oven, you may brush with a buttery spread, if you desire. 

For best results, cool before serving.

Easy, No Knead Vegan Crescent Rolls


Small Batch Easy, No Knead Vegan Crescent Rolls
 (Makes about 18 rolls)
Follow above directions, but use these amounts
I prepare a batch this size in an 8 Cup Container - the one in the above pictures.
Be sure to add in this order:

1 1/2 Cups Warm Water
2 1/2 Cups + 2 Tablespoons Unbleached, All Purpose Flour
2 Tablespoons Tapioca Starch
1/2 Cup Potato Flakes
1/4 Cup Sugar
1/2 Tablespoon Yeast
1/2 Tablespoon Salt

Stir well, then follow above directions - the same as for a large batch.

* For my 6 Quart Container, I use a new plastic shoe box from the Dollar Store.
** This dough CAN be used the day it is made - but it is a tad easier to shape after it is refrigerated. It is lightest and fluffiest when used within a day or two of when you make it, but I have used it several days later  - a week or more - and still had very good results.
*** If you bake two large pans of rolls at the same time, put one loaf on the middle rack, and one on the bottom rack. Then, set a timer to switch their positions half-way through baking, so that they brown evenly both on the top and on the bottom.

Nutritional Information
This is the nutritional info I calculated on Sparkpeople
Nutrition Facts per pound- with 1 small batch making 2 pounds, and one large batch making 4 pounds
Amount Per Pound
  • Calories 706.1
  • Total Fat 2.5 g
  • Saturated Fat 0.6 g
  • Polyunsaturated Fat 0.7 g
  • Monounsaturated Fat 1.0 g
  • Cholesterol 1.1 mg
  • Sodium 1,834.1 mg
  • Potassium 291.4 mg
  • Total Carbohydrate 155.4 g
  • Dietary Fiber 5.9 g
  • Sugars 25.9 g
  • Protein 16.9 g
 23 WW Smart Points per Pound calculated on EasyCalculation
Divide this by the number of rolls you make from a batch to get points per roll

This post was featured on:

Share the Food and Fun at the Plant-based Potluck Party Link Up #47

This is being shared at:
Plant Based Potluck Party
Home Matters Linky
Simple Saturdays 
Modest Mondays
Mom 2 Mom Monday
The Art of Homemaking Mondays
Mix it Up Monday
Motivation Monday
After My Coffee 
What'd You Do This Weekend? 
Good Tips Tuesday
Anti-Procrastination Tuesday 
Healthy, Happy, Green & Natural
Tuesdays with a Twist
Teaching What is Good
Simple Supper Tuesday
Try a New Recipe Tuesday
Wake Up Wednesday
Coffee & Conversation 
Think Tank Thursday
Traffic Jam Weekend


Monday, May 18, 2015

3 Minute Asian Peanut Sauce & 3 FAST Meals ( Vegan, with Omnivore & Gluten Free Options)

3 Minute Peanut Sauce & 3 FAST Meals!
Asian Peanut Sauce is delicious - and SOOO easy to make - and SO much cheaper than the store bought bottles.

You can whip it up in three minutes flat with ingredients that you probably already have in your kitchen. And, I made this recipe versatile - so that you're less likely to have to go out to the store to buy a special ingredient. You can mix & match what you have to make it work : )

Best of all, this sauce can be used to make a salad and three meals & that are nearly instant. Just use Pre-chopped veggies from the Produce Section or Supermarket Salad Bar, or even leftover salad veggies from the fridge, and a base starch like Pasta, Rice or Tortilla. (Many Grocery stores actually sell pre-cooked, frozen rice in the freezer section if that is your preference) These are the perfect meals for busy nights - whether you're a college student, a Parent with an evening meeting, or just someone who just doesn't like to cook.

Heat (whether Sriracha or other Hot Sauce) is completely optional - you can just use the Garlic & omit heat if that is your family's preference.

If you wish these recipes to be Gluten Free, it is easy to do. Check ingredients like Soy Sauce (Kikkoman now makes a "Blue Label" Gluten Free Variety), Vinegar, Tortillas & Pasta and make sure they're Gluten Free, and you're good to go!

If you prefer a LOWFAT version of this recipe, click here!  Asian Peanut Sauce, 3 Minute, LOWFAT, with 3 Quick Meals

If you keep cooked leftover Pasta or Rice in your freezer, this meal is already almost done!
3 Minute Peanut Sauce & 3 FAST Meals!

3 Minute Asian Peanut Sauce for One (scroll down for bigger batch)
2 Tablespoons Peanut Butter *
2 teaspoons Lime Juice (or Lemon Juice, OR Rice Vinegar**)
2 teaspoons Soy Sauce
1 to 2 teaspoons Sugar (to YOUR taste - add 1 tsp & taste before adding more)
Sriracha to taste (I use about 1/4 teaspoon) (OR 1/4 tsp Garlic, and an optional dash of your favorite hot sauce)
Water to desired consistency - about 1 - 2 Tablespoons
Gradually add liquids to Peanut Butter, stirring constantly till smooth.
 - If you like, you can add a pinch of Basil or Mint for a more complex flavor
This can be made with a fork and a small bowl,
or you can make a larger batch in a food processor if you really hate to stir : )


OR A Big Batch
1/2 Cup Peanut Butter *
2 1/2 Scant Tablespoons Soy Sauce
2 1/2 Scant Tablespoon Lime Juice or Lemon Juice or 2 Tablespoons Vinegar **
4 teaspoons Sugar (more to taste)
Sriracha Sauce, or 1 teaspoon Garlic with a few dashes of your favorite hot sauce.

3 Minute Asian Peanut Sauce

OR Customize Your Own Batch of Asian Peanut Sauce
Use
3 Parts Peanut Butter*
1 Part Lime Juice (or Lemon Juice, or 3/4 Part Vinegar**)
1 Part Soy Sauce
1/2 Part Sugar
Sriracha to taste (or Garlic & Optional Hot Sauce)
Water as needed


* I use Krema Smooth Natural Peanut Butter, but any kind will work. If you use a commercial brand like Jif or Skippy that is pre-sweetened & has added fat, you may find that you prefer to decrease the sugar ever so slightly, and increase the Soy Sauce & Citrus Juice just a tad to compensate, but if you make it just as the recipe is written, it will still be very nice - I tested it : )

**If you prefer to use a stronger vinegar - such as White or Apple Cider Vinegar, you may want to just use a little less, 1/2 to 3/4 the amount the recipe calls for

Asian Peanut Noodles
Toss above sauce with prepared Spaghetti or other noodles (cold, hot, or leftover - your choice) & Fresh veggies from the list below. Devour

FAST Asian Peanut Noodles!


Asian Peanut Rice Bowl
Fill a bowl half way with rice (leftover or fresh -your choice) and top with  Veggies of your choice from the list below. Make sure there's a little something crunchy like shredded cabbage or carrots. Top with Peanut Sauce. Devour.

FAST Asian Peanut Rice Bowl!


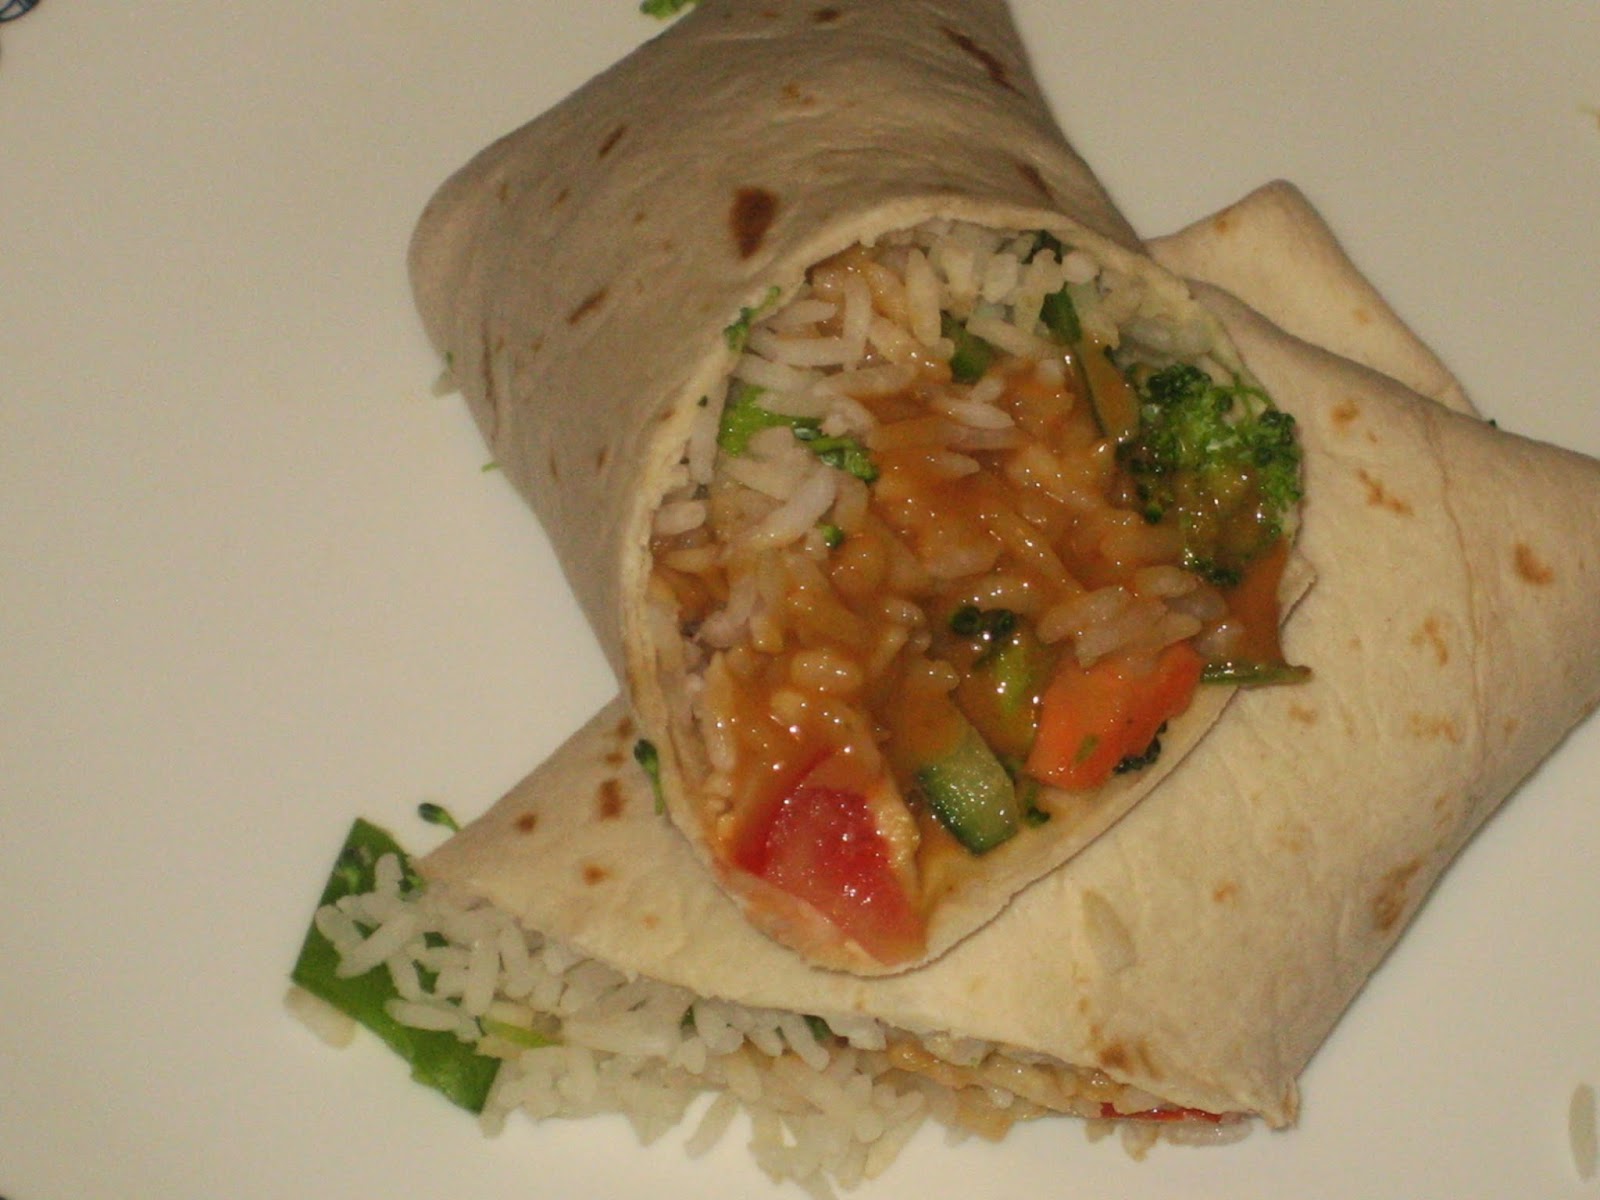
Asian Peanut Wrap
Fill a Tortilla with some Rice & Crunchy veggies. If you like, you can add cubed, sauteed or marinated tofu. Top with Peanut Sauce. Wrap up & Devour.

FAST Asian Peanut Wrap!


Asian Peanut Slaw
If you want a Super-Quick Slaw, just toss this sauce with a couple of handfuls of Bagged Coleslaw Mix from the Grocery.


American Supermarket Veggies that go well with Peanut Sauce:
You can chop these yourself, or get them from the supermarket salad bar or Produce Section.
Bell Peppers, Tomatoes, Celery, Cucumbers, Snow Peas, Shredded Cabbage, Broccoli, Bagged Coleslaw Mix, Fresh "Stir Fry Vegetables." You can also choose to add cooked veggies such as corn, peas, or crisp-tender Broccoli or Bok Choy.

Tip for Dining with Omnivores:
If you have an Omnivore at your table, Cubed Chicken would make a welcome addition to any of these meals.

This Post was Featured on:
APTuesdaysBigger-16

This is being shared on
The Art of Homemaking Mondays
What'd You Do This Weekend?
Merry Monday
Mom 2 Mom Monday
Modest Monday
Motivation Monday
Good Tips Tuesday
Simple Supper Tuesday
Anti-Procrastination Tuesday 
Healthy, Happy, Green & Natural
Teaching What Is Good
Tuesdays with a Twist
Wake Up Wednesdays
Coffee & Conversation
Penny Pinching Party
This is How We Roll Thursday
Home Matters 
Gluten Free Fridays
Food on Friday
Traffic Jam Weekend

Monday, May 11, 2015

Home School for Cheap or Free - Conversational Greek

There are two basic ways to study Greek, the first involves memorizing charts with conjugations & declensions, and writing scholarly papers about the use of the aorist tense.

The second method is much more user friendly. It involves learning to say things like, "I'd like some chocolate, please." and "Where are my keys?" People who use this method DO learn to do conjugations and declensions - but naturally - as a native speaker would.

I tried the first method first. I found myself trying to recite several charts in my head to compose a single sentence - while the conversation passed me by. Some say that when learning a "dead language" you really only need to learn the first method - that actually being able to form a sentence is unimportant. It seems to me, that a person who can only recite conjugations & declensions, and translate with the help of a dictionary, but cannot construct sentences and read fluently is simply deluding themselves about their level of mastery. I believe that whether you're learning Modern or Koine (Biblical) Greek, you simply MUST have a goal of being able to read, understand, and express yourself fluently - not simply recite charts and discuss what tense the verb is.

Needless to say, I like the second method better ; )  So, I'll be sharing the second type of resources here.


My young daughter and I study Greek together. Every day we do our lesson together, and we're making progress. AND we still have a long way to go! To homeschool Greek, you do NOT have to be a native speaker, or even fluent yourself. There are great, FREE, online resources that will help you and your child or children learn together.

The first resource that I really love is from Mango Languages (Ironic since I'm allergic to the fruit known as mangoes!) . Mango Languages are free through many American Public Libraries, but not all. You can check the Mango Languages website to be sure. This course is my daughter's favorite, and the one with which we are meeting with the most success. The lessons are short (perhaps 20 minutes each) and are presented in a way that makes the material seem pretty easy (usually we do each lesson only twice). They include speaking by a native speaker, and the text of the words being spoken on the screen. It is in a sort of a modified flash card style in which you can choose how quickly the lesson moves, and we like that we can "add more time" if needed for a particular answer - then we can check to make sure we said it right. Mango puts the printed text on the screen (with pronunciation help), so that your reading, spoken comprehension, and speaking progress together. The audio track is done by a native speaker so that you can learn proper pronunciation & accents. 

I love that this company offers both Modern and Koine - and they use the Modern pronunciation for the Koine and really teach you to UNDERSTAND the text (I just tried the first few Koine lessons, after having studied it at University many years ago- and I'm SOLD! My little daughter is picking it up MUCH more quickly with this method than I would have expected. It's pretty amazing to hear my little girl reading and speaking whole Bible verses in Koine Greek, after just a few lessons!) You can check this site to see if your library has it for free - if not, the subscription price is still pretty reasonable.

(Note, I do not use Mango's Homeschool edition - just their regular one that is FREE through my public library.)

Mango's Tech support is also amazingly wonderful! : )

Mango Greek - both Modern and Koine (Biblical)! 


The big drawback here is that there are not as many lessons as Learn Greek by Radio, and the lessons are much shorter - which means the lessons will run out before we get to a level of fluency. But, then, of course, we can continue with Learn Greek by Radio.

The second resource is Learn Greek by Radio (which is actually by computer, nowadays). It is a GREAT, online, FREE course with over 100 lessons. The lessons are about 15 minutes each, but they will probably take longer than that as you stop the audio to practice. There is an audio track with an accompanying print resource. It's a great way to practice both reading and speaking since you can hear the native speakers while you read the dialogue. It is a course that was created for the radio in the 1960's - so a few terms and the accent might be a tiny bit old fashioned. You'll also find the occasional politically incorrect bit- like counting how many cigarettes are in a box. Learn Greek by Radio requires a little more initiative by the student than Mango Greek. You will need to to practice outside the lesson time, and study a bit and decide when mastery is reached, rather than just knowing (as with Mango) "I can get all the cards right, I'm ready to move on!"


Learn Greek by Radio


Here is a very nice, FREE online dictionary. Of course, remember that with a Greek dictionary, you'll have to be able to figure out the "Lexical form" of the word to look it up - which can be a little tricky when you're a beginner.

Greek-English, English-Greek Dictionary

If you encounter a word you don't know, you can also look it up on Google Translate - for this you don't even need to know the "lexical form." But be warned, Google Translate cannot usually tell you declensions and such, but it can usually give you a basic definition - or at least a close enough word that you can figure it out from there. 

I also sometimes use the Greekpod Vocabulary videos on Youtube. Like this one:

Greek Vocabulary - in the Home

Greek Vocabulary - Colors


For young children, we have really enjoyed "Greek 4 Kids" videos. They're not free, but they have a nice kid-friendly multimedia presentation. The first teaches things like counting & colors, the second teaches a few Greek Vocabulary words for each letter of the Greek alphabet, the third (our favorite) follows a little boy, Alex, through his day and teaches simple sentences, and the fourth simply conjugates 18 verbs. (If you're only going to buy one of them, buy #3 : )

Greek 4 Kids Videos


If you prefer formal lessons, it is also worth noting that many (if not most) Greek Orthodox Parishes offer Greek School for both Children and Adults. It is worth a call to your local Greek Orthodox Church if you'd like to inquire about formal lessons. Generally there IS a fee for these classes, but not always. Either way, it's worth asking. Most worship services are also partly in Greek and partly in English, often including reading from the Gospels in the original language.

Find your local Greek Orthodox Church

Many, if not most, American Greek Schools buy their resources from the following site - so if you're looking for proven books and resources, you may want to check out their site (these are not free, and I have not personally used them)

Greek 123

I would be remiss if I did not mention that I, personally, have found Pimsleur Greek Lessons VERY helpful. They are expensive, but I have been very happy with them. It would be worth checking to see if they're available at your local library. Pimsleur Language lessons are ideal if you want to learn conversation without worrying about reading first. They're also perfect if your best time for study is while driving in the car. I did the entire first course during my commute to work back when I was single. At the current time, Pimsleur offers Greek One and Two, but has no plans for offering Greek Three.

Pimsleur Greek

Finally, a note about what type of Greek to learn:

When I first began studying Greek, I focused on Koine (aka New Testament Greek) because I wanted to be able to read the New Testament in its original language. Later, I became Greek Orthodox, and married a Greek Husband. At that point, I began studying Modern Greek so that I could speak to my dear, sweet Mother-in-Law (not to mention being able to order a coffee or find the restroom when we travel to visit her!). You know what I found? No matter which type of Greek you study, it will help your understanding of the other one. If you know Modern Greek well, Koine Greek will begin to come alive (As with Modern English & Shakespearean English, Koine Greek and Modern Greek are different - but, there's a LOT of overlap!). Having sufficient proficiency in Modern Greek to actually hold a conversation will have tremendous application when studying Koine Greek - and that level of proficiency is next to impossible to attain while studying Koine alone. And, as you add bits and pieces of Koine Greek understanding (as a dead language, it is very hard to actually master "speaking" Koine) it will add to your understanding of Modern. (Other forms, like Attic, I would only recommend for those who are seeking to major in Classical Languages - but they, too, have a lot of overlap with Modern & Koine) Because of that, I would encourage anyone who wants to understand the language of the Bible not to shy away from Modern Greek - in fact to pursue it - it will be a real asset! 

 If this interests you, check out other posts in this series:

Homeschool for Cheap or Free: Reading Greek 

and

Homeschool for Cheap or Free: Why Greek is Better than Latin!

This is being shared at
Making Your Home Sing Monday
Mix It Up Monday
The Art of Homemaking Mondays
Motivation Monday
Good Tips Tuesday 
Mom 2 Mom Monday 
Anti-Procrastination Tuesday 
Trivium Tuesdays 
Together on Tuesdays
Wake Up Wednesdays 
Mom's Library 
Penny Pinching Party
Coffee & Conversation 
Tell it to Me Tuesday 
So Much at Home 
This is How We Roll Thursday
Home Matters